What You Will Build
JdbcTemplate를 사용하여 관계형 데이터베이스에 접근하기
Initial
프로젝트를 생성하며 JDBC API와 H2 Database의 Dependencies를 추가하거나, build.grade에서 직접 추가한다.
1
2
3
4
5
6
7
8
|
dependencies {
	implementation 'org.springframework.boot:spring-boot-starter-web'
	compileOnly 'org.projectlombok:lombok'
	annotationProcessor 'org.projectlombok:lombok'
	testImplementation 'org.springframework.boot:spring-boot-starter-test'
	implementation 'org.springframework.boot:spring-boot-starter-jdbc' //new
	runtimeOnly 'com.h2database:h2' //new
}
|
Create a Customer Object
src/main/java/com/example/relationaldataaccess/Customer.java
 1
 2
 3
 4
 5
 6
 7
 8
 9
10
11
12
13
14
15
16
17
18
19
20
21
|
package com.example.relationaldataaccess;

public class Customer {
  private long id;
  private String firstName, lastName;

  public Customer(long id, String firstName, String lastName) {
    this.id = id;
    this.firstName = firstName;
    this.lastName = lastName;
  }

  @Override
  public String toString() {
    return String.format(
        "Customer[id=%d, firstName='%s', lastName='%s']",
        id, firstName, lastName);
  }

  // getters & setters는 간략화를 위해 생략
}
|
Store and Retrieve Data
Spring은 SQL 관계형 데이터베이스와 JDBC를 사용하기 쉽게 해주는 JdbcTemplate이라는 템플릿 클래스를 제공한다.
JdbcTemplate는 리소스 획득, 연결 관리, 예외 처리 및 코드의 목적과는 전혀 관련이 없는 일반적인 오류 확인 등을 대신 처리해준다.
src/main/java/com/example/relationaldataaccess/RelationalDataAccessApplication.java
 1
 2
 3
 4
 5
 6
 7
 8
 9
10
11
12
13
14
15
16
17
18
19
20
21
22
23
24
25
26
27
28
29
30
31
32
33
34
35
36
37
38
39
40
41
42
43
44
45
46
47
48
49
50
|
package com.example.relationaldataaccess;
import org.slf4j.Logger;
import org.slf4j.LoggerFactory;
import org.springframework.beans.factory.annotation.Autowired;
import org.springframework.boot.CommandLineRunner;
import org.springframework.boot.SpringApplication;
import org.springframework.boot.autoconfigure.SpringBootApplication;
import org.springframework.jdbc.core.JdbcTemplate;
import java.util.Arrays;
import java.util.List;
import java.util.stream.Collectors;
@SpringBootApplication
public class RelationalDataAccessApplication implements CommandLineRunner {
private static final Logger log = LoggerFactory.getLogger(RelationalDataAccessApplication.class);
public static void main(String args[]) {
SpringApplication.run(RelationalDataAccessApplication.class, args);
}
@Autowired
JdbcTemplate jdbcTemplate;
@Override
public void run(String... strings) throws Exception {
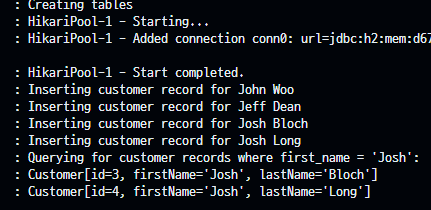
log.info("Creating tables");
jdbcTemplate.execute("DROP TABLE customers IF EXISTS");
jdbcTemplate.execute("CREATE TABLE customers(" +
"id SERIAL, first_name VARCHAR(255), last_name VARCHAR(255))");
List<Object[]> splitUpNames = Arrays.asList("John Woo", "Jeff Dean", "Josh Bloch", "Josh Long").stream()
.map(name -> name.split(" "))
.collect(Collectors.toList());
splitUpNames.forEach(name -> log.info(String.format("Inserting customer record for %s %s", name[0], name[1])));
jdbcTemplate.batchUpdate("INSERT INTO customers(first_name, last_name) VALUES (?,?)", splitUpNames);
log.info("Querying for customer records where first_name = 'Josh':");
jdbcTemplate.query(
"SELECT id, first_name, last_name FROM customers WHERE first_name = ?",
(rs, rowNum) -> new Customer(rs.getLong("id"), rs.getString("first_name"), rs.getString("last_name")), "Josh")
.forEach(customer -> log.info(customer.toString()));
}
}
|
Spring Boot는 H2(인메모리 관계형 데이터베이스 엔진)를 지원하며 자동으로 연결을 생성한다.
현재는 spring-jdbc를 사용하기 때문에, Spring Boot는 자동으로 JdbcTemplate을 생성한다.
String... strings는 임의의 개수의 문자열을 매개변수로 받음을 의미- 여러 insert문을 이용한다면
batchUpdate사용, 단일이라면 insert
- arguments에
?를 이용하여 SQL injection 공격을 피할 수 있음
결과